Getting started with RealityKit 1: Programmatically placing content in RealityKit
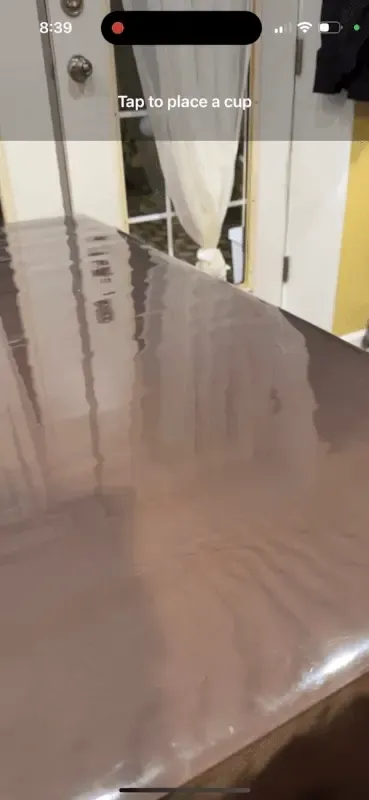
In this tutorial you will create an iOS app where a user can tap the screen to place 3D content in their physical environment. You will learn how to load 3D resources from files into RealityKit entities and anchor them to phsyical locations in the real world. At the end of this guide there will be a link to download the finished version of the app we are building.
Create an augmented reality app #
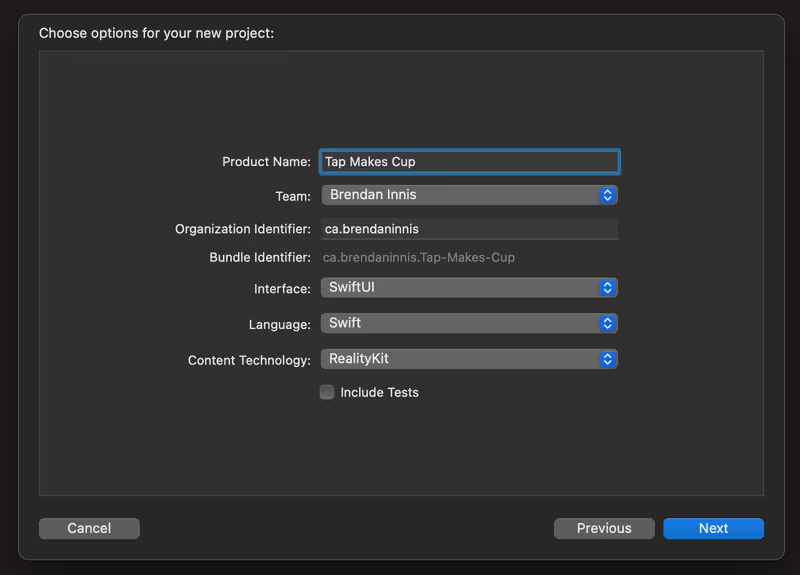
Open Xcode, and select "Create a new Xcode project". A window will open with a list of template to choose from. Select "Augmented Reality App" and press Next. Choose a name for your app, select SwiftUI as the value for "Interface" and RealityKit as the value for "Content Technology". Your new project should look like this:
This will create a project containing an AppDelegate.swift file, a ContentView.swift file containing our main SwiftUI layout, a template RealityKit Experience.rcproject file and a set of assets for your project.
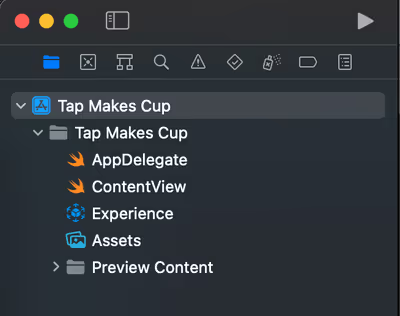
We will not be using the AppDelegate or the RealityKit Experience, so those files should be deleted.
Create a new Swift file for your SwiftUI App. Create a struct named after you app, implement the SwiftUI.App protocol and then let's track the the scene phase of the environment:
// TapMakesCupApp.swift

import Foundation
import SwiftUI

@main
struct TapMakesCupsApp: SwiftUI.App {
    @Environment(\.scenePhase) var scenePhase

    var body: some SwiftUI.Scene {
        WindowGroup {
            ContentView()
                .onChange(of: scenePhase) { newPhase in
                    switch newPhase {
                    case .active:
                        print("App did become active")
                    case .inactive:
                        print("App did become inactive")
                    default:
                        break
                    }
                }
        }
    }
}
Let's also remove the code in ContentView.swift that references the default Experience our project was created with:
// DELETE THESE LINES:

// Load the "Box" scene from the "Experience" Reality File
let boxAnchor = try! Experience.loadBox()

// Add the box anchor to the scene
arView.scene.anchors.append(boxAnchor)
Now we can run the app. There is not much going on right now, since we are just looking at an empty ARView, but notice the app state changes are printed in the console when the app becomes active and when you move the app to the background:
App did become active
App did become inactive
Load 3D assets programmatically from USDZ files #
Since we removed the RealityKit Experience file our template project was created with, we need 3D models to populate our AR experience. You can find a variety of USDZ models available for download in Apple's AR Quick Look gallery. I chose the cup and saucer set for my app. Click any of the models in the gallery to download it.
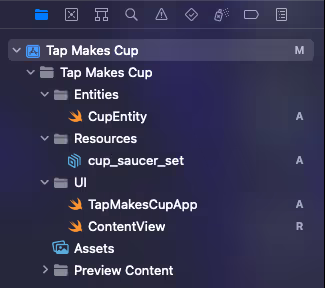
Create a new group in your Xcode project called Resources and add the USDZ file to the the group. Then create another group called Entities and create a new Swift file within it called CupEntity.swift. Let's also create another group to contain our SwiftUI files: we will call it UI.
We are going to use the Entity.loadAsync type method to load the USDZ file as a RealityKit entity. Entities are holder objects for your RealityKit content. They exist within a RealityKit scene hierarchy, where the Scene object created by ARView is the root object. To load the cup and saucer model we pass the name of the file, without the .usdz extension, to Entity.loadAsync. As long as the USDZ file is included in your application main bundle, the entity method will find the file.
Create a CupEntity struct that inherits from Entity with a static var loadAsync like this:
import Foundation
import Combine
import RealityKit

final class CupEntity: Entity {
    var model: Entity?

    static var loadAsync: AnyPublisher<CupEntity, Error> {
        return Entity.loadAsync(named: "cup_saucer_set")
            .map { loadedCup -> CupEntity in
                let cup = CupEntity()
                loadedCup.name = "Cup"
                cup.model = loadedCup
                return cup
            }
            .eraseToAnyPublisher()
    }
}
We will get a new instance of CupEntity by using the loadAsync static computed property. It will load the cup and saucer file into an entity, which we will store in a CupEntity object that we will publish. This returns a Publisher object from the Combine framework which will inform our subscriber when the cup is loaded.
Pre-load 3D resources #
Let's create another new file in Entities called ResourceLoader.swift. ResourceLoader will be a class responsible for pre-loading our entities, and making them available to our application. We will create a method called loadResources which will return when our 3D assets are loaded. This method returns an AnyCancellable object from Combine so that we can halt the heavy load task if required.
// ResourceLoader.swift

import Foundation
import Combine
import RealityKit

class ResourceLoader {
    typealias LoadCompletion = (Result<CupEntity, Error>) -> Void

    private var loadCancellable: AnyCancellable?
    private var cupEntity: CupEntity?

    func loadResources(completion: @escaping LoadCompletion) -> AnyCancellable? {
        guard let cupEntity else {
            loadCancellable = CupEntity.loadAsync.sink { result in
                if case let .failure(error) = result {
                    print("Failed to load CupEntity: \(error)")
                    completion(.failure(error))
                }
            } receiveValue: { [weak self] cupEntity in
                guard let self else {
                    return
                }
                self.cupEntity = cupEntity
                completion(.success(cupEntity))
            }
            return loadCancellable
        }
        completion(.success(cupEntity))
        return loadCancellable
    }
}

enum ResourceLoaderError: Error {
    case resourceNotLoaded
}
Next, we will create a class called ViewModel to manage our data and inform the UI of changes. ViewModel will be an ObservableObject that will load our assets and publish the state of pre-loading for the UI to observe. Create a new file in UI called ViewModel.swift:
import Foundation
import Combine
import ARKit
import RealityKit

final class ViewModel: NSObject, ObservableObject {
    /// Allow loading to take a minimum amount of time, to ease state transitions
    private static let loadBuffer: TimeInterval = 2

    private let resourceLoader = ResourceLoader()
    private var loadCancellable: AnyCancellable?

    @Published var assetsLoaded = false

    func resume() {
        if !assetsLoaded && loadCancellable == nil {
            loadAssets()
        }
    }

    func pause() {
        loadCancellable?.cancel()
        loadCancellable = nil
    }

    // MARK: - Private methods

    private func loadAssets() {
        let beforeTime = Date().timeIntervalSince1970
        loadCancellable = resourceLoader.loadResources { [weak self] result in
            guard let self else {
                return
            }
            switch result {
            case let .failure(error):
                print("Failed to load assets \(error)")
            case .success:
                let delta = Date().timeIntervalSince1970 - beforeTime
                var buffer = Self.loadBuffer - delta
                if buffer < 0 {
                    buffer = 0
                }
                DispatchQueue.main.asyncAfter(deadline: .now() + buffer) {
                    self.assetsLoaded = true
                }
            }
        }
    }
}
Now we can update our SwiftUI App to assets right away when the app launches. If the app is put into the background, we will cancel loading and begin again once the app comes back into the foreground. Update your app file so it looks like this:
@main
struct TapMakesCupsApp: SwiftUI.App {
    @Environment(\.scenePhase) var scenePhase

    @StateObject var viewModel = ViewModel()

    var body: some SwiftUI.Scene {
        WindowGroup {
            ContentView()
                .environmentObject(viewModel)
                .onChange(of: scenePhase) { newPhase in
                    switch newPhase {
                    case .active:
                        print("App did become active")
                        viewModel.resume()
                    case .inactive:
                        print("App did become inactive")
                        viewModel.pause()
                    default:
                        break
                    }
                }
        }
    }
}
Next, update your ContentView.swift file to include a loading message which will be displayed when the assets have not yet loaded:
import SwiftUI
import RealityKit

struct ContentView : View {
    @EnvironmentObject var viewModel: ViewModel

    var body: some View {
        ZStack {
            // Fullscreen camera ARView
            ARViewContainer().edgesIgnoringSafeArea(.all)

            // Loading screen
            ZStack {
                Color.white
                Text("Loading resources...")
                    .foregroundColor(Color.black)
            }
            .opacity(viewModel.assetsLoaded ? 0 : 1)
            .ignoresSafeArea()
            .animation(Animation.default.speed(1),
                       value: viewModel.assetsLoaded)
        }
    }
}

struct ARViewContainer: UIViewRepresentable {

    func makeUIView(context: Context) -> ARView {
        let arView = ARView(frame: .zero)
        return arView
    }

    func updateUIView(_ uiView: ARView, context: Context) {}

}

#if DEBUG
struct ContentView_Previews : PreviewProvider {
    @StateObject static var viewModel: ViewModel = {
        return ViewModel()
    }()

    static var previews: some View {
        ContentView()
            .environmentObject(viewModel)
    }
}
#endif
Run the app now. The ViewModel will load the resources when it is resumed on the app launch. You will see a loading message which will disappear after the assets are loaded and 2 seconds have elapsed. If you background the app when you first launch it, asset loading will be cancelled and resumed when you bring the app back to the foreground.
Programmatically place content in the real world #
Now it's time for the fun part. First, we need a way to make new cups to place in the world. Open up the ResourceLoader and add a new method called createCup:
func createCup() throws -> Entity {
    guard let cup = cupEntity?.model else {
        throw ResourceLoaderError.resourceNotLoaded
    }
    return cup.clone(recursive: true)
}
The clone method of Entity allows you to create a new copy of an exiting entity, and the recusive option copies all the entities under it in the heirarchy, which we need as well. We use this method to create copies of our cup. We are expecting this method to be called only after pre-loading our assets, so we throw an error if the cup has not been loaded yet. Speaking of which, let's define that error now:
enum ResourceLoaderError: Error {
    case resourceNotLoaded
}
Next, we are going to add code to our ViewModel to manage the state of our cups and ARSession. First, create a dictionary variable to hold on to the anchors that will anchor our cups to the real world:
private var anchors = [UUID: AnchorEntity]()Then we can create a new method called addCup to add cups to the scene. It will take 3 arguments:
anchoris theARAnchorthat will anchor the cup to a surface in the real world.worldTransformis a matrix which describes the position to place the cup in the world.viewis theARViewof our app. We need to pass it to this method to add content to the ARScene.
Create the method like this:
    func addCup(anchor: ARAnchor,
                at worldTransform: simd_float4x4,
                in view: ARView) {
        // Create a new cup to place at the tap location
        let cup: Entity
        do {
            cup = try resourceLoader.createCup()
        } catch let error {
            print("Failed to create cup: \(error)")
            return
        }

        defer {
            // Get translation from transform
            let column = worldTransform.columns.3
            let translation = SIMD3<Float>(column.x, column.y, column.z)

            // Move the cup to the tap location
            cup.setPosition(translation, relativeTo: nil)
        }

        // If there is not already an anchor here, create one
        guard let anchorEntity = anchors[anchor.identifier] else {
            let anchorEntity = AnchorEntity(anchor: anchor)
            anchorEntity.addChild(cup)
            view.scene.addAnchor(anchorEntity)
            anchors[anchor.identifier] = anchorEntity
            return
        }

        // Add the cup to the existing anchor
        anchorEntity.addChild(cup)
    }
For each anchor that we wish to attach content to, we need an AnchorEntity which will act as the parent for our cup entities and tether them to the real world. If we don't have an AnchorEntity for the anchor we are interested in, we create one. We create a new cup and add it as a child of our anchor entity.
Finally, in the defer block, we set the position of the cup to the desired real world position. The transform includes a size, position and orientation, but since we are only interested in the position we get the translation from the transform and apply it to the cup with setPosition.
There is one more thing we have to do before we can place cups in the real world.
Configure ARSession #
We want to place cups on horizontal surfaces in the real world. To do this, we will configure our ARSession for horizontal plane detection. Create a new method in ViewModel called configureSession:
func configureSession(forView arView: ARView) {
    let config = ARWorldTrackingConfiguration()
    config.planeDetection = [.horizontal]
    arView.session.run(config)
    arView.session.delegate = self
}
Now horizontal surfaces will be automatically detected for our ARSession. Additionally, we set the ViewModel as the delegate for our session. It will be informed of updates to our anchors. We are going to conform to the ARSessionDelegate and implement a method to be informed when anchors are no longer detected and removed, so we can removed the orphaned cups associated with them:
// MARK: - ARSessionDelegate

extension ViewModel: ARSessionDelegate {
    func session(_ session: ARSession, didRemove anchors: [ARAnchor]) {
        anchors.forEach { anchor in
            guard let anchorEntity = self.anchors[anchor.identifier] else {
                return
            }
            // Lost an anchor, remove the AnchorEntity from the Scene
            anchorEntity.scene?.removeAnchor(anchorEntity)
            self.anchors.removeValue(forKey: anchor.identifier)
        }
    }
}
Good, now we can keep track of only the anchors that are holding cups in the real world. Let's finish this app so we can see our AR content in action!
Translate tap locations into real world positions #
Open up ContentView.swift. Edit ARViewContainer so that it looks like this:
struct ARViewContainer: UIViewRepresentable {
    @EnvironmentObject var viewModel: ViewModel

    func makeUIView(context: Context) -> ARView {
        let arView = ARView(frame: .zero)

        // Configure the session
        viewModel.configureSession(forView: arView)

        // Capture taps into the ARView
        context.coordinator.arView = arView
        let tapRecognizer = UITapGestureRecognizer(target: context.coordinator,
                                                   action: #selector(Coordinator.viewTapped(_:)))
        tapRecognizer.name = "ARView Tap"
        arView.addGestureRecognizer(tapRecognizer)

        return arView
    }

    func updateUIView(_ uiView: ARView, context: Context) {}

    class Coordinator: NSObject {
        weak var arView: ARView?
        let parent: ARViewContainer

        init(parent: ARViewContainer) {
            self.parent = parent
        }

        @objc func viewTapped(_ gesture: UITapGestureRecognizer) {
            let point = gesture.location(in: gesture.view)
            guard let arView,
                  let result = arView.raycast(from: point,
                                              allowing: .existingPlaneGeometry,
                                              alignment: .horizontal).first,
                  let anchor = result.anchor
            else {
                return
            }
            parent.viewModel.addCup(anchor: anchor,
                                    at: result.worldTransform,
                                    in: arView)
        }
    }

    func makeCoordinator() -> ARViewContainer.Coordinator {
        return Coordinator(parent: self)
    }
}
This will configure our ARSession when it is created. Taps on the view will be captured. We can use the touch point in our ARView to project a ray that will intersect with detected horizontal planes. The first result will be the first plane intersected by that ray, this is the location where we want to place our cup. We pass the anchor for the intersected plane and the transform of the intersection to ViewModel.addCup.
Run the app! When you tap on detected horizontal planes, it will place a cup there. If you want more help visualizing anchors and detected planes, you can add debug options to the ARView:
// debug options are powerful tools for understanding RealityKit
arView.debugOptions = [
    .showAnchorOrigins,
    .showAnchorGeometry
]
Complete project #
The complete TapMakesCup cap is available as a guide and starting app template on my GitHub here.